The Blocking Editor
The blocking editor is a full-screen visual tool for creating stage diagrams that show where characters are positioned during a scene. These diagrams — called blocking maps — can be linked to specific pages, scenes, or songs in your production.
Opening the editor
From the script view, open the Blocking panel and click New to create a new blocking map, or click Open in Editor on an existing one.
Editor layout
The blocking editor is divided into three areas:
Canvas (center)
The main workspace where you place and arrange character stickers, scenery items, text labels, and freehand drawings. If you've added a background image (like a ground plan or set design), it appears here. You can also enable a stage grid for precise positioning.
Info bar (top)
- Title — A name for this blocking map (e.g., "Act 1, Scene 2 — Opening positions")
- Page number — Links the blocking map to a specific script page
- Linked structure item — Connect this blocking to an act, scene, or song from your production structure
- Short description — A one-line summary
- Detailed notes — Multi-line notes and instructions
Sidebar (right)
Six tabs:
- Characters — Lists all characters in your production. Drag characters from here onto the canvas.
- Scenery — Browse the theatrical item library, production-specific assets, and manage scenery on the canvas. See Scenery items.
- Layers — Manage blocking layers. Each layer can hold its own set of elements, and layers can be shown or hidden independently.
- Info — View and edit the blocking map's metadata (title, page, linked structure item, description, notes).
- Maps — Browse all blocking maps in the production. Switch between maps, create new ones, or delete existing ones without leaving the editor.
- Templates — Save and manage map templates that contain stage setups (scenery, background, calibration, grid) without character positions.

Canvas tools
The floating toolbar at the bottom of the canvas provides tool modes and quick actions:
Select tool
The default mode. Click elements to select them, drag to move them. Select multiple elements by tapping with shift held. When 2+ characters are selected, a Group button appears to create a character group.
Draw tool
Freehand drawing directly on the canvas using pen, highlighter, or eraser tools. See Freehand drawing.
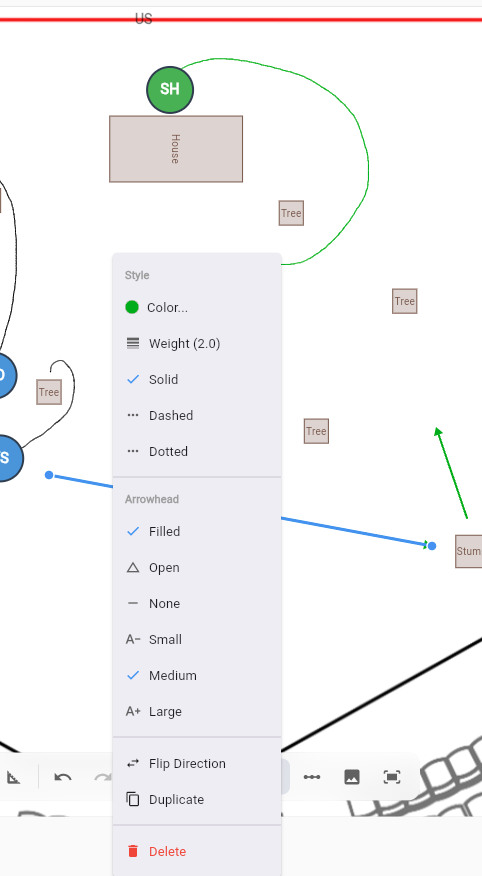
Arrow tool
Place directional arrows on the canvas to indicate movement paths, sightlines, or crossover patterns. Click once to set the tail (start), then click again to set the head (end).
Double-tap an arrow to open its context menu with options:
- Dash style — Solid, dashed, or dotted
- Arrowhead type — Filled, open, or none
- Arrowhead size — Small, medium, or large
- Color — Choose from 12 preset colors
- Weight — Adjust stroke width from 0.5 to 8.0
- Flip direction — Reverse the arrow
- Duplicate — Create a copy offset slightly from the original
Arrows can be dragged by their body to reposition, or by their endpoints to adjust direction.
Scale calibration tool
Set a real-world scale for your stage by placing two points and entering the distance between them (in feet or meters). This calibration is used by scenery items and the dance placement ribbon to display accurate dimensions. Calibrating the scale also auto-resizes library scenery items to their real-world dimensions.
Quick actions
- Undo / Redo — Step backward or forward through your changes
- Grid toggle — Show or hide the stage grid overlay
- Stage labels toggle — Show or hide stage direction labels (SR, SL, US, DS, etc.)
- Performer view — Rotate the canvas 180° so upstage is at the bottom, matching what a performer sees facing the audience
Freehand drawing
When the Draw tool is active, a drawing sub-toolbar appears with:
- Pen — Standard freehand drawing with pressure sensitivity (Apple Pencil and other styluses)
- Highlighter — Semi-transparent strokes for marking areas
- Eraser — Remove individual strokes by touching them
- Color palette — Choose from 12 preset colors or pick a custom color
- Stroke width — Adjust the line thickness
Drawings are saved as canvas elements and can be placed on specific layers.

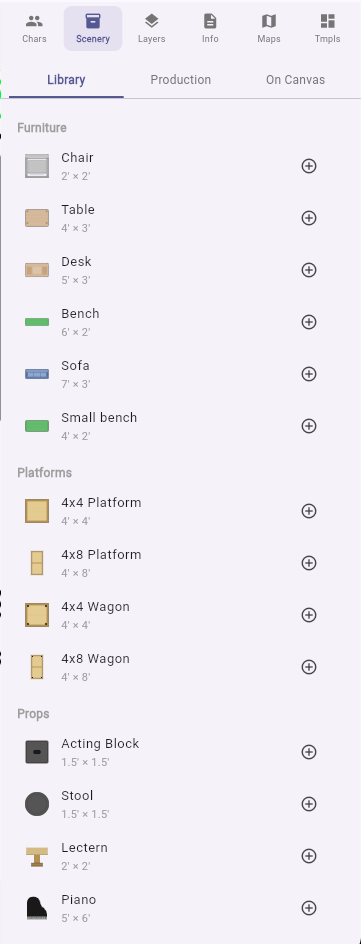
Scenery items
The Scenery panel lets you place set pieces and props on the canvas:
Library items
A built-in collection of standard theatrical items (platforms, flats, furniture, etc.) with plan-view artwork. Library items have real-world dimensions and scale automatically based on your scale calibration.
Production assets
Upload show-specific scenery images for your production. These are shared across all blocking maps in the production.
On Canvas
View and select scenery items that are currently placed on the canvas.
Spike colors
Each scenery item can have a spike tape color — a colored marker showing where the item should be placed on the stage floor. Set the spike color from the Properties panel.
Character groups
Select 2 or more character stickers and click Group to create a character group. Groups render as a dashed rectangle enclosing the member characters with a label (e.g., "Ensemble Left", "Dancers"). Moving the group moves all member characters together. Groups can be ungrouped from the Properties panel.
Text labels
Add free-form text labels directly on the stage diagram for stage directions, position notes, or any other text. Text labels support custom color and font size.
Alignment guides
When you drag a scenery item or sticker across the canvas, alignment guides appear automatically as magenta lines showing where the element's edges or center line up with other elements. Guides detect alignment on left, center, and right edges horizontally, and top, center, and bottom edges vertically. This makes it easy to line up set pieces precisely without relying on a grid.

Dance placement ribbon
A horizontal numbered line placed on the canvas for choreography spacing. The ribbon displays numbers counting outward from center (0) in both directions (...3 2 1 0 1 2 3...), with spacing equal to one real-world unit (foot or meter) based on the map's scale calibration.
- Resize using the side handles — more numbers appear as the ribbon gets wider
- Move by dragging the ribbon body
- Lock via double-click context menu to prevent accidental movement
- Snap to grid lines and other scenery elements when positioning
- Performer view — numbers rotate for readability when the canvas is in performer view

Note
If no scale calibration is set, the ribbon shows a "Set Scale for accurate spacing" overlay. Calibrate your stage first for accurate measurements.
Grid overlay
Toggle the stage grid from the floating toolbar to display a reference grid over the canvas. The grid can be configured for spacing and snap-to-grid behavior. The grid origin (crosshair) can be dragged to reposition, and locked to prevent accidental movement.

Background images
You can add a stage layout or set design image as the canvas background:
- Click the Pick Background button in the toolbar
- Select an image file from your device
- Use Edit Background Transform to adjust the image — move, scale, rotate, or crop it to fit your needs
- Use Reset Background Transform to return to the default position
Tip
If your company has a venue configured, the venue's default background image can be used automatically.
Venues
Venues represent a physical stage or theater space. They store stage dimensions, a default background image (ground plan), and template scenery elements. When a venue is linked to a blocking map, its stage setup is pre-populated. Venues are managed at the company level and can be reused across productions.
Map templates
A blocking map can be saved as a template that contains only the stage setup (scenery, background, calibration, grid) without any character positions. Templates can be used to quickly create new blocking maps with a pre-configured stage layout.
Draft and published maps
Blocking maps start as drafts that are only visible to their creator in the Maps panel. Once saved, they become published and are visible to all team members.
Exporting a blocking map
Individual blocking maps can be exported directly from the editor toolbar's More menu:
- Export as PNG — saves the canvas as a high-resolution image
- Export as PDF — saves the canvas as a PDF page
On web, the file downloads directly. On mobile and desktop apps, it saves to your device storage.

For exporting blocking maps alongside your script, see Sharing & Exporting.
Cloning a map
From the More menu, choose Clone to create a copy of the current blocking map with all elements, background, and settings. The clone gets a "(Copy)" suffix in its title.
Auto-save
Changes are automatically saved shortly after you stop making edits. A "Saving..." indicator appears in the toolbar while a save is in progress. Each save also generates a thumbnail for the blocking map — one for the director view and one for the performer view.
Related
- Character Stickers — How to place, move, and customize stickers
- Blocking Thumbnails — Preview images for your blocking maps
- Tags — Placing blocking maps on script pages